Achieving a durable and beautiful surface that lets the character of your wood shine through is the primary goal when choosing a clear wood floor finish. This essential protective layer shields against daily wear while preserving the natural grain, tones, and textures that make hardwood floors so appealing.
Understanding Clear Wood Floor Finishes

Diving into the world of floor finishes can seem daunting with the array of options available, each promising durability, beauty, and ease of application. Understanding the fundamental differences between these clear wood floor finish options is the first crucial step in making an informed decision that aligns with your specific needs and expectations for your wood floors. This section will break down the various types, their individual strengths and weaknesses, and guide you in choosing the finish best suited for your home environment and the specific characteristics of your wood species.
Types of Clear Finishes: A Comprehensive Overview

The landscape of clear wood floor finishes is diverse, encompassing a range of chemical compositions and application methods that result in varying levels of durability, appearance, and maintenance requirements. Historically, oil-based finishes were the standard, prized for their rich, ambering effect and deep penetration. However, environmental concerns and advancements in technology have paved the way for water-based alternatives, moisture-cured urethanes, and even hard-wax oils, each offering distinct advantages and disadvantages. The choice among these types significantly impacts not just the initial look and feel of the floor but also its long-term performance and how much effort is needed to keep it looking its best. Identifying the dominant characteristics of each type is key to selecting the protective layer that will best serve your floors for years to come.
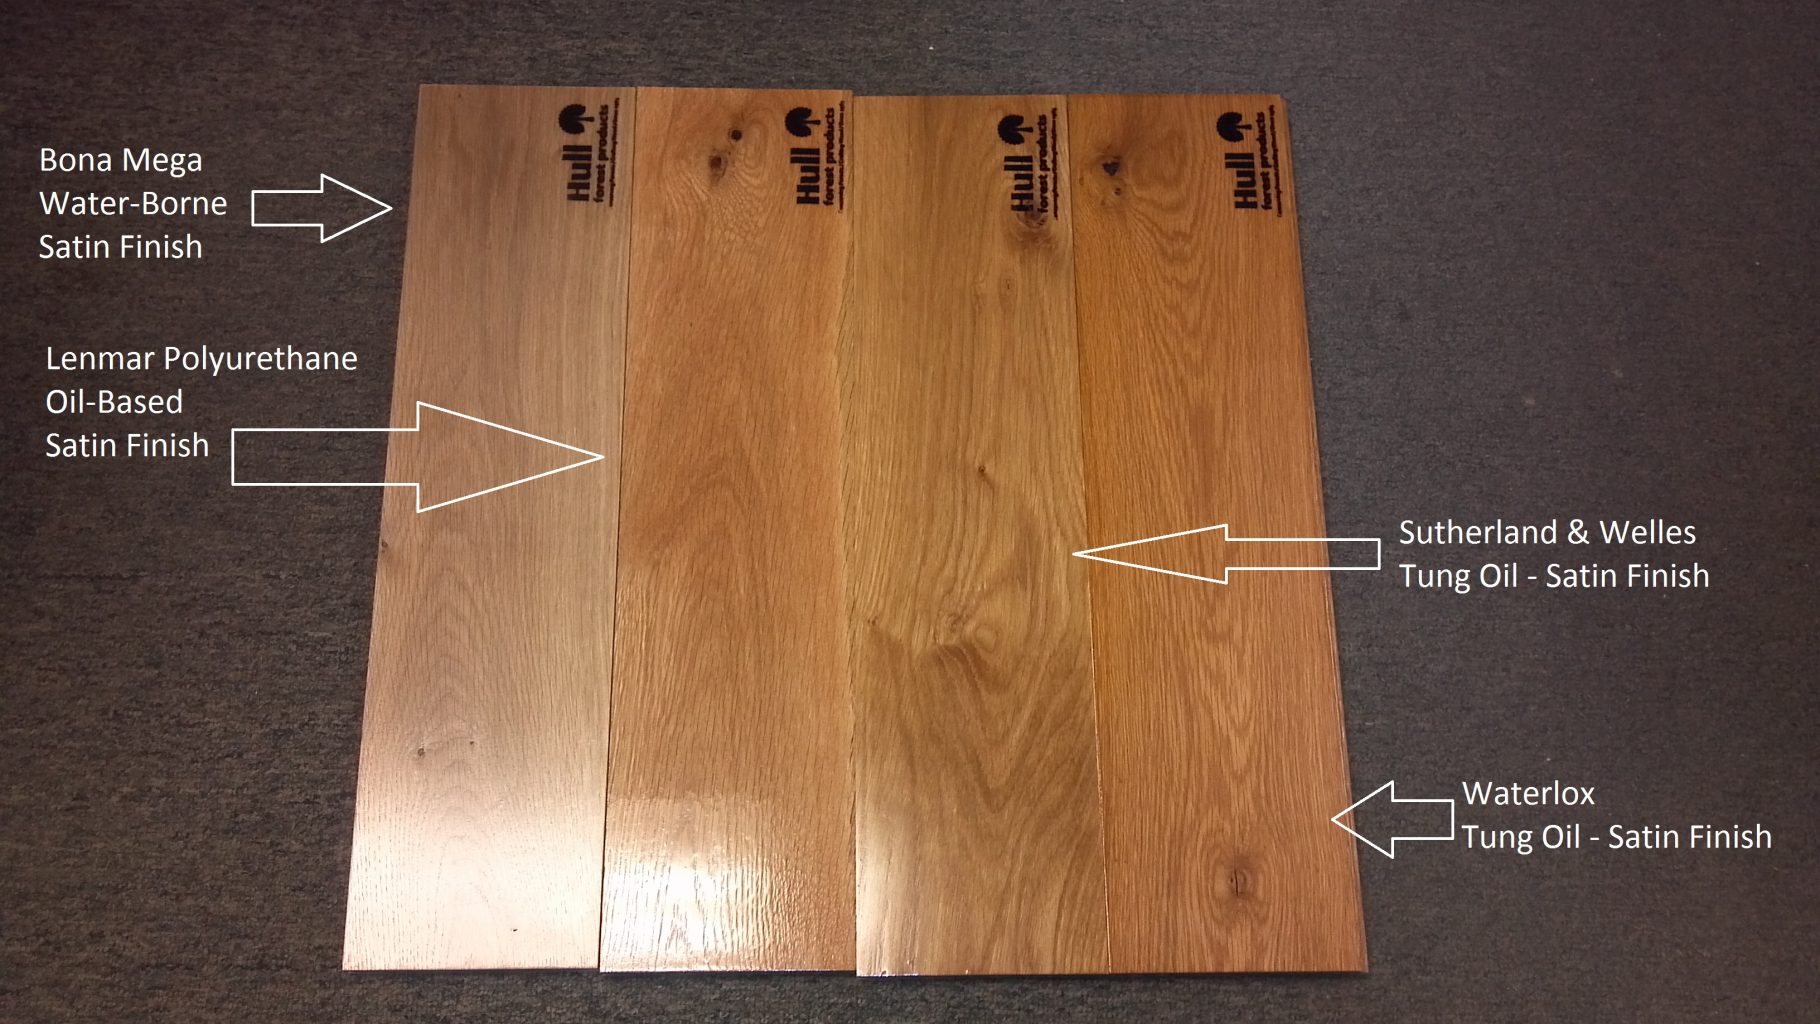
When considering the myriad options for a clear wood floor finish, understanding the basic categories and their primary carriers is paramount. Oil-based polyurethanes, for instance, utilize mineral spirits as their solvent, resulting in finishes that are known for their durability, moisture resistance, and characteristic amber hue which deepens over time, giving wood a warm, aged look. These finishes typically have strong odors and longer drying times compared to their water-based counterparts, requiring good ventilation during application and curing. They are generally robust and forgiving during application, often the choice for high-traffic areas or historical renovations where the ambering effect is desired.
Water-based polyurethanes, on the other hand, use water as their primary carrier, making them significantly lower in Volatile Organic Compounds (VOCs) and odor. This makes them a more environmentally friendly and user-friendly option, especially in occupied homes. While early water-based finishes were often criticized for a perceived lack of durability compared to oil, modern formulations have drastically improved, offering excellent protection and abrasion resistance. They tend to dry clear or with very minimal ambering, preserving the natural color of the wood species, which is often preferred for lighter woods like maple or for achieving a more contemporary aesthetic. They dry much faster than oil-based finishes, allowing for quicker recoating and reduced downtime, although this speed also requires faster application techniques to avoid lap marks.
Beyond polyurethanes, other clear wood floor finish types offer alternative looks and performance characteristics. Moisture-cured urethanes are incredibly durable and solvent-heavy, often used in commercial settings or areas requiring extreme abrasion resistance. They cure rapidly in the presence of moisture, which can be advantageous but also requires careful control of humidity during application. Hard-wax oils, a blend of natural oils and waxes, penetrate the wood to provide a natural feel and matte finish, while the wax component offers a surface layer of protection. These finishes are popular for their ease of spot repair and their ability to allow the wood to “breathe,” but they may require more frequent maintenance and are generally less resistant to water spots than polyurethanes.
Here’s a simple breakdown of common clear finish types:
- Oil-Based Polyurethane:
- Solvent: Mineral Spirits
- Appearance: Ambers over time, deepens wood color
- Durability: High (abrasion, moisture)
- Drying Time: Long (hours to days)
- VOCs/Odor: High
- Application: Forgiving, levels well
- Water-Based Polyurethane:
- Solvent: Water
- Appearance: Clear or slight ambering, preserves natural color
- Durability: High (modern formulations), good abrasion
- Drying Time: Short (hours)
- VOCs/Odor: Low
- Application: Requires faster technique, prone to lap marks
- Moisture-Cured Urethane:
- Solvent: Various (often strong)
- Appearance: Varies (clear to slightly amber)
- Durability: Very High (extreme abrasion)
- Drying Time: Fast (with moisture)
- VOCs/Odor: Very High
- Application: Professional usually needed, sensitive to humidity
- Alkyd/Oil Resins (e.g., Tung Oil, Linseed Oil finishes):
- Solvent: Various (often mineral spirits)
- Appearance: Penetrating, natural low sheen, enhances grain
- Durability: Lower surface protection vs. film finishes, requires reapplication
- Drying Time: Very Long (days to weeks for full cure)
- VOCs/Odor: Varies (can be strong)
- Application: Wipe-on or brush, multiple coats needed
It’s important to recognize that within each category, particularly with water-based polyurethanes, quality and performance can vary significantly between brands and product lines. Higher-quality professional-grade finishes often contain stronger resins and additives that enhance durability and flow, justifying their higher cost. Understanding these distinctions allows you to move beyond generic classifications and specifically choose a clear wood floor finish engineered for the demands your floor will face.
Pros and Cons of Each Finish Type: Durability, Appearance, Maintenance
Evaluating the advantages and disadvantages of each clear wood floor finish type is essential for making a decision that balances aesthetic preference with practical considerations like resistance to wear and ease of upkeep. No single finish is universally “best”; the ideal choice depends heavily on the specific environment, expected traffic levels, potential exposure to moisture or chemicals, and the owner’s willingness to engage in routine maintenance or eventual repair. Each finish type has a unique profile concerning its protective capabilities, the visual impact it has on the wood, and how it fits into a long-term maintenance plan. Weighing these pros and cons systematically helps clarify which option provides the most suitable combination of factors for your floor project.
Oil-based polyurethanes are renowned for their exceptional durability, particularly against scuffs, scratches, and moisture. Their deep penetration and hard, thick film build provide a robust shield that stands up well to heavy foot traffic, making them a traditional favorite for living areas and hallways. The significant upside is their longevity and protective quality. However, their downsides include high VOC levels and strong odors that necessitate extensive ventilation, long drying and curing times that can disrupt household routines for days or even weeks, and the irreversible ambering effect, which might clash with modern design aesthetics or lighter wood species where maintaining a natural look is desired. Application can also be slightly more challenging for a novice due to the slower drying, which, while forgiving of technique errors, extends the overall project timeline.
Water-based polyurethanes offer the compelling advantage of being low-VOC and low-odor, making them a much more pleasant and healthier option to work with indoors and allowing for quicker reoccupation of the space. Their fast drying times enable multiple coats in a single day, dramatically accelerating the project speed. Modern formulations boast impressive abrasion resistance and clarity, preserving the natural color of the wood beautifully. The primary “con” often cited is that some formulations may not offer the exact same level of heavy-duty impact or moisture resistance as the toughest oil-based polyurethanes, though this gap has significantly narrowed. The fast drying also means application requires a quicker, more consistent hand to avoid visible lap marks where wet and dry areas meet, which can be a steeper learning curve for DIYers. Maintenance is generally straightforward, similar to oil-based finishes once cured.
Looking at hard-wax oils and penetrating finishes, their major ‘pro’ is the unique, natural feel they impart to the wood – it feels like wood, not plastic. They enhance the grain’s texture and allow for easy spot repairs of scratches or worn areas without needing to refinish the entire floor, a huge maintenance advantage. Their low sheen can also be aesthetically appealing for those seeking a matte look. However, their “cons” lie in their relatively lower surface durability compared to film-building finishes; they may be more susceptible to staining from spills, require more frequent reapplication of a maintenance coat, and are not as water-resistant as a polyurethane film, making them less ideal for kitchens or bathrooms. The initial application can also be labor-intensive, requiring careful buffing into the wood.
Moisture-cured urethanes, while less common in residential settings due to their high VOCs and finicky application, are a clear winner in terms of sheer abrasion resistance and speed of curing once moisture is introduced. Their major ‘pro’ is industrial-level durability. Their significant ‘cons’ include very high VOC content, intense odors, potential flammability risks, sensitivity to environmental moisture levels during application (too much humidity can cause bubbling, too little can prevent curing), and the fact that they are very difficult for a non-professional to apply correctly. They also tend to give a slightly yellowing or ambering effect, similar to oil-based poly, but sometimes more opaque.
Choosing the Right Finish for Your Lifestyle and Wood Type: Traffic, Moisture, Species Considerations
Selecting the optimal clear wood floor finish is a decision that must be tailored to the specific circumstances of your home, not just based on general popularity or assumed durability. The best finish is one that effectively meets the demands placed on your floors by your household’s activity level, the potential for exposure to moisture or spills, and the inherent characteristics of the wood species itself. Thoughtful consideration of these factors ensures the finish provides long-lasting protection and maintains its appearance without requiring excessive maintenance or prematurely failing. This selection process is where the theoretical knowledge of finish types translates into a practical choice that will impact your daily life and the longevity of your flooring investment.
The level of foot traffic a room receives is perhaps the single most important factor in choosing a durable clear wood floor finish. High-traffic areas like entryways, hallways, and living rooms demand finishes with excellent abrasion resistance. In these zones, tougher film-building finishes like oil-based or high-quality water-based polyurethanes are typically the most practical choice. They create a hard, protective layer that can withstand the constant scuffing, scraping, and general wear from shoes, pets, and movement. Lower-traffic rooms, such as bedrooms or formal dining areas, might allow for finishes that prioritize aesthetics or feel, like hard-wax oils or lower-durability water-based options, as they won’t face the same level of daily abuse. Consider how many people and pets live in your home, as this directly correlates to foot traffic intensity.
The potential for moisture exposure or spills is another critical consideration, guiding you toward finishes with strong water resistance. Kitchens, dining areas, or rooms adjacent to exterior doors or bathrooms are more likely to encounter water, spilled drinks, or even pet accidents. Film-building finishes, particularly polyurethanes (both oil and water-based, though modern water-based are very good), form a continuous barrier that effectively repels liquids, preventing them from penetrating the wood and causing stains or damage. Penetrating finishes like oils and waxes, while beautiful, offer less surface protection against standing water or spills and may require immediate cleanup to avoid issues. If moisture is a significant concern, prioritizing a finish with high water repellency is non-negotiable for long-term floor health.
Finally, the wood species itself plays a crucial role in finish selection. Different wood types have varying densities, grain patterns, and natural colors, all of which interact uniquely with different finishes. For instance, softwoods like pine or fir may benefit from a tougher, film-building finish that provides greater surface hardness to protect against dents, as the wood itself is easily marked. Hardwoods like red or white oak, known for their prominent grain and durability, look stunning under almost any finish, but their grain texture must be considered during application. Woods with fine grains like maple or cherry show scratches more readily, sometimes favoring finishes that are either very hard or that allow for easier touch-ups. The natural color of the wood is also key: if you love the pale look of raw maple, a clear or non-yellowing water-based finish is likely preferable over an oil-based one that will impart an amber tone. Conversely, some people love the warmth oil-based finishes bring to darker woods like walnut or exotic species.
Understanding these interdependencies between lifestyle, environment, and wood type allows for a more nuanced decision than simply picking the most popular or highest-rated finish. A family with children and pets in a busy household needs a different level of durability than a single occupant in a quiet home. A kitchen floor needs better moisture protection than a living room floor. And the aesthetic goal—whether preserving the natural look or enhancing it with warmth—should align with the finish’s effect on color. By carefully evaluating these factors, you can confidently select the clear wood floor finish that will not only protect your investment but also enhance the beauty and functionality of your floors for years to come.
The Importance of Surface Preparation: Sanding, Cleaning, and Repair
Successfully applying any clear wood floor finish hinges critically on the quality of the surface preparation. Simply put, a finish is only as good as the surface it adheres to. Attempting to apply a premium finish over poorly sanded, dirty, or damaged wood will inevitably lead to disappointing results – poor adhesion, visible imperfections, uneven appearance, and reduced durability. This stage, often the most physically demanding and time-consuming part of the process, is absolutely non-negotiable for achieving professional-looking results and ensuring the longevity of the finish. Investing the time and effort into meticulous preparation pays dividends by allowing the finish to perform as intended.
The preparation process typically begins with sanding, which serves multiple vital purposes. First and foremost, sanding removes old finishes, waxes, dirt, and scratches, creating a fresh, clean layer of bare wood. It also levels the floor surface, smoothing out minor irregularities and ensuring a uniform plane for the finish. Sanding progresses through a series of grits, starting coarse (e.g., 40 or 60 grit) to remove the old finish and flatten the floor, moving incrementally to medium grits (e.g., 80 or 100 grit) to refine the surface and remove sanding marks from the previous step, and finishing with fine grits (e.g., 120 or 150 grit, sometimes even finer for certain finishes or wood species) to achieve a smooth surface ready to accept the finish. The degree of smoothness required depends on the finish type; penetrating oils or hard-wax oils often prefer slightly finer sanding (up to 150 grit for oils, sometimes 180-220 for waxes) to help with absorption and buffing, while film-building polyurethanes typically stop around 100 or 120 grit to ensure good mechanical adhesion. Failing to sand sufficiently or skipping grits leaves behind scratches or inconsistencies that will become glaringly obvious once the clear wood floor finish is applied.
After sanding, thorough cleaning is paramount. Every last particle of dust and debris must be removed from the floor and the surrounding environment. Fine dust from sanding can settle on the wet finish, creating a gritty texture or visible specks that mar the appearance. This involves vacuuming meticulously, using a powerful vacuum with brush attachments to get into edges and corners. After vacuuming, the standard practice is to wipe down the floor, typically with a tack cloth or a microfiber cloth slightly dampened with mineral spirits (for oil-based finishes) or water (for water-based finishes, though test area first as moisture can raise grain). The goal is to pick up any dust particles that the vacuum missed. This step must be repeated until absolutely no dust is visible on the floor or comes up on a test cloth. Dust control also extends beyond the floor itself; covering doorways, turning off HVAC systems, and cleaning walls and ceilings can help prevent airborne dust from contaminating the freshly finished surface.
Before the final sanding pass and certainly before cleaning, any necessary repairs should be addressed. Deep gouges, cracks, or loose boards should be fixed. Small nail holes or minor cosmetic imperfections can often be filled with wood filler specifically designed for floors, chosen to match the wood species’ color if clear filling isn’t an option. It’s important to use a filler that is stainable or finishable if you plan to use a finish that significantly alters the wood color or if the filler will be visible. After the filler dries, it must be sanded flush with the surrounding wood surface. Addressing repairs at this stage prevents them from becoming permanent eyesores under the clear finish. The integrity of the subfloor should also be checked; squeaky boards or movement can cause finish failure over time. Proper surface preparation, encompassing detailed sanding, meticulous cleaning, and necessary repairs, lays the groundwork for a beautiful, durable, and long-lasting clear wood floor finish. It is the most crucial investment of time and effort in the entire refinishing process.
Video

Video source from Youtube
Applying Your Chosen Clear Finish
With the floor meticulously prepared – sanded smooth, cleaned of every speck of dust, and repaired – the exciting stage of applying the clear wood floor finish begins. This is where the protective layer is finally laid down, transforming the raw wood into a finished surface. However, the application process itself requires careful technique specific to the chosen finish, attention to detail, and patience. Mistakes made during application can be frustrating to correct and can compromise the final appearance and durability. This section will guide you through the practical steps of applying the finish, ensuring you are well-prepared, understand the correct methods, can troubleshoot common problems, and manage the crucial drying and curing periods effectively.
Preparation is Key: Protecting the Surrounding Area,Gathering Supplies
Before you even open the can of clear wood floor finish, a series of critical preparatory steps inside the room itself must be completed. This stage is about more than just having the finish on hand; it’s about creating a controlled environment, protecting everything you don’t want to get finish on, and ensuring you have all necessary tools and supplies readily accessible. Skipping or rushing this preparation can lead to costly damage to surrounding areas, delays during the application process, and ultimately, a less-than-perfect finish. A well-prepared work area and a complete set of supplies minimize distractions and potential problems, allowing you to focus solely on applying the finish correctly and efficiently.
Protecting the surrounding area is paramount. Any furniture, decorative items, or anything else not being finished must be removed from the room entirely. Closets should be emptied and their doors closed and taped shut to prevent dust and vapors from entering and to protect items inside. Walls, baseboards, and trim adjacent to the floor need protection. The simplest and most effective way to do this is by applying painter’s tape along the bottom edge of the baseboards and trim. Use high-quality tape designed for clean removal, especially if leaving it for extended periods between coats. If finishing near entryways, consider taping off plastic sheeting across doorways to contain dust and fumes within the work area, especially when using high-VOC finishes like oil-based poly. Protecting adjacent flooring surfaces (like tile, carpet, or transitions) is also essential, typically done by taping down heavy paper or plastic sheeting securely. Remember that fumes can rise, so covering or protecting items in overhead cabinets or shelves might also be necessary depending on the ventilation setup.
Gathering all necessary supplies before starting the finishing process is equally crucial. Imagine being halfway through a coat and realizing you’re missing a brush, roller cover, or a stirring stick; stopping mid-application can ruin the seamless flow of the finish. You’ll need the chosen clear wood floor finish itself, ensuring you have enough product for the planned number of coats following the manufacturer’s coverage rate guidelines (it’s always better to have a little extra than run out). You’ll need applicators appropriate for your chosen finish type and technique – this could be T-bars, rollers designed for floor finishes, brushes for edges and corners, or spray equipment if using a sprayable finish. Also essential are clean buckets or trays for pouring the finish, stirring sticks (never shake polyurethane, as it introduces bubbles!), rags for wiping spills, painter’s tape, protective sheeting/paper, and highly recommended Personal Protective Equipment (PPE).
PPE is non-negotiable, especially when working with finishes that contain solvents. This includes safety glasses or goggles to protect your eyes from splashes, chemical-resistant gloves (nitrile gloves are often suitable, but check the finish’s requirements) to protect your skin, and adequate respiratory protection. For oil-based polyurethanes and moisture-cured urethanes, a respirator with organic vapor cartridges is essential due to high VOCs. For water-based polyurethanes, while lower in VOCs, a dust mask or a respirator with particulate filters is still advisable to avoid inhaling atomized finish or dust particles. Ensuring good ventilation by opening windows and using fans (positioned to blow air OUT, away from the wet finish) is also part of the preparation, helping to dissipate fumes and aid drying, but care must be taken to avoid creating drafts that stir up dust. Having all these items ready and a clear plan in place before you start applying the clear wood floor finish guarantees a smoother, safer, and more successful application.
Step-by-Step Application Guide: Techniques for Different Finishes (e.g., brushing, rolling, spraying)
Applying a clear wood floor finish is a process that requires careful technique and attention to detail, varying slightly depending on the type of finish and the chosen application method. While the specific motions might differ, the core principles remain the same: work efficiently, maintain a wet edge, avoid overworking the finish, and apply thin, even coats. Understanding the correct technique for your chosen finish and tool is vital to achieve a smooth, uniform, and durable surface free from unsightly marks like streaks, bubbles, or lap lines. Approaching this stage with patience and precision is far more effective than rushing.
For brushing or rolling film-building finishes like polyurethane (both oil and water-based) onto edges and smaller areas, or even the primary application in tight spaces, control is key. Using a high-quality natural bristle brush for oil-based polyurethane provides good flow and holds a generous amount of finish, allowing for smooth, even strokes. Synthetic brushes are necessary for water-based finishes, as natural bristles can absorb water and become limp. When brushing, work with the grain of the wood, applying steady pressure to lay down a consistent film. Avoid digging the brush into the wood or flicking it, which can introduce bubbles. Maintain a wet edge by overlapping your strokes slightly with the previous one. Apply the finish evenly and avoid going back over areas that have already started to set up, as this disrupts the leveling process and can create pull marks or streaks. For larger areas using a roller, choose a low-nap roller cover designed for floor finishes; regular wall paint rollers are unsuitable. Pour the finish into a roller tray and saturate the roller, then roll it onto the floor in sections, working with the grain, maintaining a wet edge across passes. The goal is to lay down the finish without applying too much pressure, allowing it to level naturally.
When applying film-building finishes like polyurethane over larger areas using a T-bar applicator – a popular tool for floors – the technique emphasizes efficiency and speed to maintain a wet edge. A T-bar consists of a flat pad (usually lamb’s wool for oil, synthetic for water-based) attached to a long handle. For oil-based poly, use a lamb’s wool pad, which holds a lot of finish. For water-based, use a synthetic pad. Start by “cutting in” the edges of the room with a brush or edger pad. Then, pour a line of finish onto the floor several inches from an edge (parallel to the grain). Dip the T-bar into the puddle, coating the pad. Then, using a pushing motion with the grain, spread the finish across the section, working backward out of the room. Maintain a consistent angle on the T-bar to ensure even application. Regularly replenish the “puddle” or dip the pad back into the finish to maintain a wet edge where the newly applied finish meets the previous pass. Overlap each pass slightly to ensure full coverage. The speed at which you work is critical, particularly with fast-drying water-based finishes; plan your escape route from the room to finish in a systematic path without painting yourself into a corner.
Applying penetrating finishes like hard-wax oils or traditional oils requires a different approach, one focused on working the finish into the wood rather than just laying it on the surface. These finishes are typically applied with a brush, roller, or often, more effectively, with a buffer equipped with appropriate pads (like a red or white pad) or with cloths. The key is to apply a relatively thin coat, allow it a specified penetration time as directed by the manufacturer, and then meticulously buff off any excess finish that has not absorbed into the wood. Allowing excess finish to remain on the surface will result in sticky spots or areas that don’t harden properly. Application usually involves working in small sections, applying the finish and then buffing before moving on. Multiple thin coats with buffing in between are usually required to build up sufficient protection. This technique demands significant manual effort for buffing, or access to a floor buffer, but rewards with a very natural look and feel. Regardless of the finish or method, always work systematically, maintain quality ventilation, and allow adequate drying time between coats as per the manufacturer’s instructions for your specific clear wood floor finish.
Dealing with Common Application Issues: Runs, drips, uneven coverage, bubbles
Even with meticulous preparation and careful application, issues can sometimes arise when applying a clear wood floor finish. Identifying these problems quickly and knowing how to address them can save your project from disaster and help you achieve a smoother, more professional-looking result. Common issues include visible runs or drips, areas of uneven coverage, and bothersome bubbles in the finish. Understanding the causes of these problems often points directly to the appropriate solution, reinforcing the importance of technique and environmental control during the finishing process. Addressing these issues promptly is crucial, ideally while the finish is still wet or only partially cured, although some might require sanding and recoating.
Runs and drips typically occur on vertical surfaces like risers or baseboards, or from overloaded applicators that deposit too much finish in one spot on the floor, causing it to pool and run. The primary cause is applying too much finish at once or not spreading it out evenly. If you catch a run or drip while the finish is still wet, you can often gently brush or roll it out to redistribute the excess finish. Work with the grain and feather the edges to blend it in. If the run or drip has already started to skin over or dry, attempting to brush it out will likely make it worse, creating streaks and texture differences. In this case, it’s often best to let the coat dry completely, then carefully sand the affected area (and potentially a larger surrounding area for blending) down to the level of the rest of the finish or even back to bare wood if severe, then carefully reapply the finish to that section or the entire area. Proper applicator loading – not overly saturated – and even distribution are the best prevention.
Uneven coverage manifests as lighter or thinner spots, or areas with differing sheen levels. This can happen if the applicator isn’t delivering a consistent amount of finish, if passes aren’t overlapped adequately, or if the finish is drying too quickly in certain areas due to drafts or temperature variations. With water-based finishes, inadequate ‘cutting in’ of edges or a lack of speed across the main floor can lead to visible lap lines where sections dried before they could blend. To fix uneven coverage while the finish is wet, try to redistribute the finish carefully with your applicator, ensuring even flow and proper overlap. If the finish has dried unevenly, the fix usually involves screening or light sanding the entire surface with a fine grit (like 220 or 320 grit) to create a uniform texture and remove minor discrepancies, then applying another full, even coat of the clear wood floor finish. Ensure consistent application speed and overlap on subsequent coats.
Bubbles are another common issue, often caused by shaking the finish can instead of stirring it, using an improper or linty roller cover/pad, overworking the finish by brushing or rolling back and forth excessively, or applying the finish too thickly. Fast-drying water-based finishes can be more prone to trapping bubbles before they have a chance to pop and level. Warm conditions and drafts can also exacerbate bubbling by causing the surface to skin over too quickly. If you see bubbles forming immediately after application, sometimes gently dragging a clean brush or roller over the surface (without lifting) can help them pop. If bubbles are present after the finish has dried, the only effective solution is typically to lightly sand or screen the entire surface with a fine grit to remove the bubbles and provide a smooth base, then apply subsequent thin, even coats. Prevention is key: always stir, never shake, use recommended applicators, and apply thin coats without overworking. Controlling temperature and airflow can also help minimize bubbling with your chosen clear wood floor finish.
Drying and Curing Times: Understanding the Process and Avoiding Mistakes
Understanding the distinction between drying time and curing time is absolutely critical when applying any clear wood floor finish. These terms are often used interchangeably, but they represent very different stages of hardening with significant implications for when you can safely walk on, place furniture on, or resume full use of your floors. Treating a floor that is merely dry-to-touch as fully cured can lead to damage, including permanent scuffs, dents, or even adhesion failure, requiring costly repairs or refinishing. Patience during these periods is not just recommended; it’s essential for the long-term success and durability of your newly finished floors. Disregarding the manufacturer’s guidelines for drying and curing is one of the most common mistakes DIYers make.
Drying time refers to the period required for the solvents or water in the finish evaporate, leaving behind the solidified resin film on the wood surface. During the drying phase, the finish transitions from a liquid state to a solid film. This is typically measured in hours and refers to when the finish is dry enough to walk on lightly in socks or apply another coat. Manufacturer instructions will provide guidelines for drying times between recoats, which can range from as little as 2-3 hours for fast-drying water-based finishes to 12-24 hours or more for oil-based polyurethanes. Environmental factors like temperature, humidity, and airflow significantly impact drying times; higher temperatures, lower humidity, and good airflow generally accelerate drying, while cooler temperatures, high humidity, and poor ventilation slow it down. It’s important to adhere closely to the manufacturer’s recommendations for the specific clear wood floor finish you are using, as applying a new coat too soon can trap solvents/water, leading to adhesion problems or a hazy appearance.
Curing time, on the other hand, refers to the period required for the finish to reach its maximum hardness and durability through chemical cross-linking or oxidation. This is a much longer process, typically measured in days or even weeks, depending on the finish type. During curing, the finish undergoes chemical reactions that strengthen the film and make it resistant to scuffs, scratches, dents, and household chemicals. For most polyurethanes, full cure can take anywhere from 7 to 30 days. While the floor may feel hard and dry to the touch after a day or two, it is still relatively soft and vulnerable during the curing phase. This is why you are advised to wait a specific period before placing furniture back on the floor, introducing rugs, or resuming normal foot traffic. Walking on the floor too soon, especially with shoes that could track in grit or have abrasive soles, can easily scuff the still-soft finish. Placing heavy furniture before the finish is fully cured can cause permanent indentations.
Respecting curing times means implementing a phased return to normal use. Light foot traffic in socks is usually permissible after the initial drying period (e.g., 24 hours). However, it’s generally recommended to wait several days (e.g., 3-5 days) before allowing normal foot traffic in shoes and a week or two before returning furniture. When furniture is returned, lift it into place rather than sliding it across the floor, and attach felt pads to
Read also : Wide Plank White Oak Wood Flooring: A Comprehensive Guide